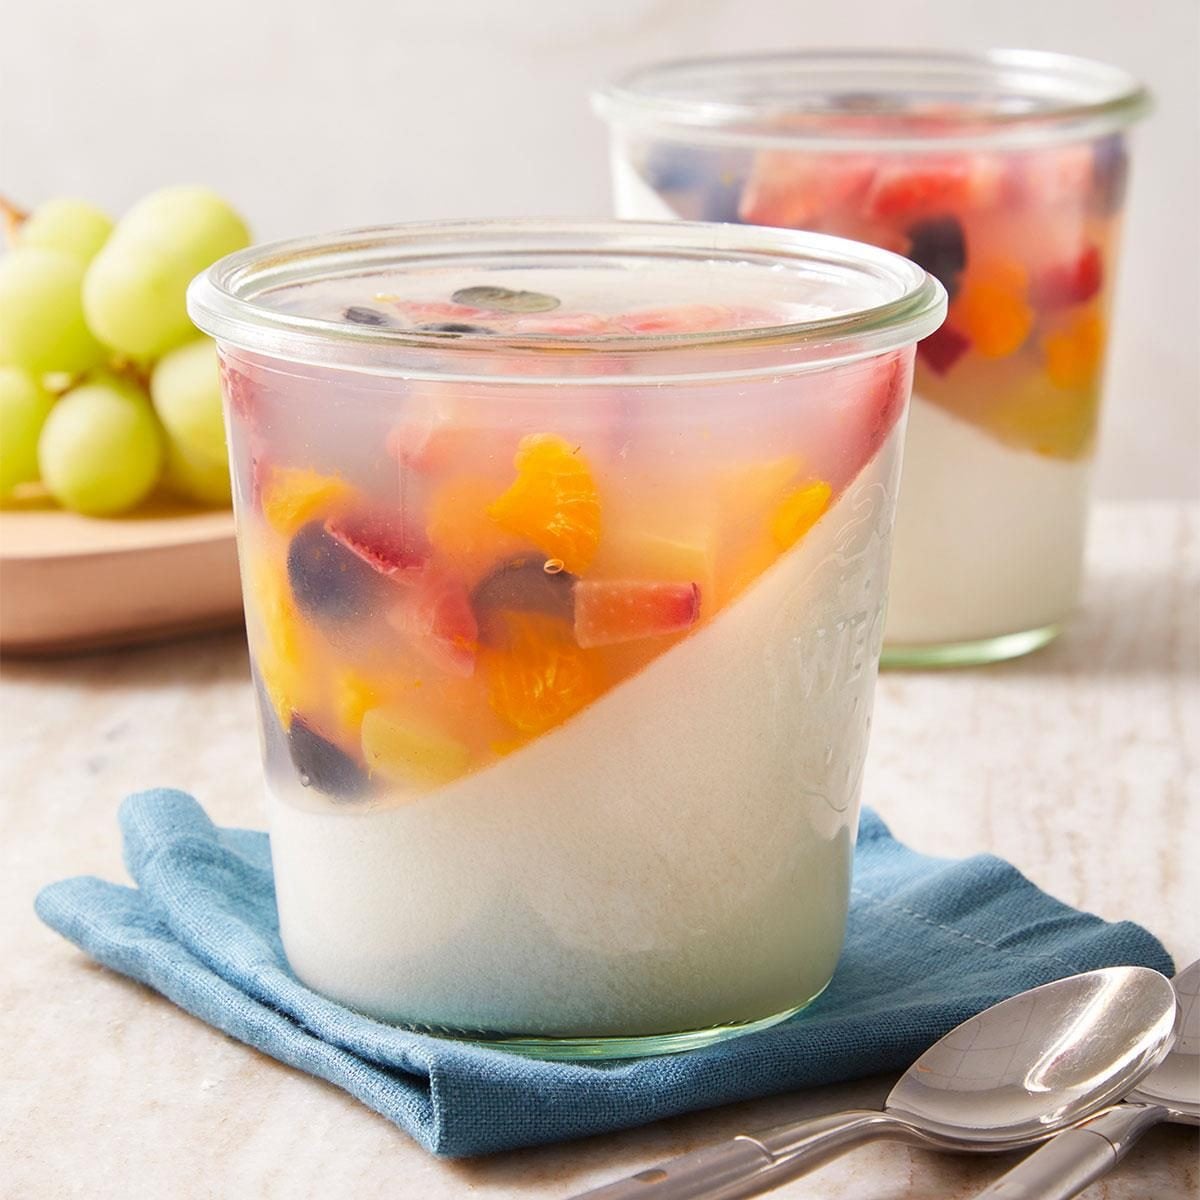
These layered fruit jelly cups seem to defy gravity, proving a make-ahead dessert can still turn heads.
Gelatin has long been used to create some of the best-looking party desserts. You can layer different colors and flavors for different effects, add fruit if you want, or mix it up into an old-fashioned creamy fluff salad. These visually stunning layered fruit jelly cups are similar to those familiar desserts, except they’re made with agar-agar instead of gelatin.
The clean diagonal line slicing through each of these layered jelly cups gives them a wow factor. On one side sits a creamy coconut layer; on the other, a nearly clear jelly dotted with colorful fruit. Recipe developer Tam To sets up the tidy presentation with one easy move: resting the jars at an angle while the first layer sets, then standing them upright for the second layer.
The cups come out cold and bright, with the fruit still tasting fresh inside the jelly. It’s a welcome dessert during a heat wave or after a heavier meal, and it will become a fast favorite for anyone who loves layered desserts.
Ingredients for Layered Fruit Jelly Cups
- Coconut water: Coconut water is the base of both jelly layers, lending them its clean, tropical flavor. Reach for an unsweetened variety so the finished cups don’t turn cloying once the honey is added.
- Agar-agar powder: Derived from seaweed, agar-agar is the workhorse gelling agent of this recipe. It sets at room temperature and holds its shape well (better than gelatin), making it a reliable choice for layered desserts.
- Coconut milk: Coconut milk adds richness to the coconut layer, and gives it an opaque, creamy color that plays off the translucent fruit jelly above it. Full-fat canned coconut milk delivers the silkiest result.
- Honey: Honey sweetens the coconut jelly and complements the coconut milk’s flavor. Clover and orange blossom are two types of honey that echo the tropical notes especially well.
- Strawberries: Thinly sliced strawberries bring a pop of red and a tartness to the fruit layer. Choose berries that are firm and fully ripe so they hold their shape.
- Blueberries: These little jewels scatter bursts of color and a sweet-tart bite throughout the fruit jelly. Look for plump berries with a silvery bloom—a sign of freshness.
- Green grapes: Quartering the grapes helps distribute their crisp texture evenly through the layer. Their pale green color also adds welcome contrast against the red and blue fruit.
- Pomelo: The largest of the citrus fruits, pomelo fruit offers firm, mildly sweet segments that are less acidic than grapefruit. If you can’t find one, any citrus works well here—just peel away the bitter membranes so only the tender flesh goes into the jelly.
Directions
Step 1: Make the coconut jelly base

In a small saucepan, combine the coconut water and agar-agar, stirring until smooth. Let it stand for five minutes. Cook the mixture over medium heat until it comes to a boil, whisking continuously. Reduce the heat to low, then add the coconut milk and honey. Simmer the mixture for two minutes, stirring occasionally.
Editor’s Tip: Agar-agar only activates once it reaches a full, rolling boil, so don’t shortcut that step or the jelly may never set firmly. It’s also much more potent than gelatin and won’t substitute one-to-one, so measure it carefully and stick to the amounts called for in each layer.
Step 2: Pour and set the coconut layer

Place the Mason jars or serving cups at an angle inside a container. Carefully pour the coconut jelly into the jars. Let it stand at room temperature until it’s set, or refrigerate the jelly at an angle for 30 minutes.
Editor’s Tip: A muffin tin, a loaf pan lined with a towel, or an egg carton all work well for holding the jars steady at an angle while the coconut layer sets.
Step 3: Make the fruit jelly
In a small saucepan, combine the coconut water and agar-agar. Let the mixture stand for five minutes. Cook it over medium heat until it comes to a boil, whisking continuously. Let it stand for five minutes.
Step 4: Coat the fruit with jelly

Place the strawberries, blueberries, grapes and pomelo pieces in a bowl, and pour the jelly over top. Stir to coat the fruit.
Step 5: Assemble and set the cups

Remove the jars from the container so they stand upright. Pour the fruit jelly over the top. Cover the jars loosely, and let them stand at room temperature or refrigerate them until the jelly is fully set.

Layered Fruit Jelly Cups Variations
- Commit to the tropical vibe: Trade the berries and grapes for mango cubes, kiwi slices and lychee to make a fruit layer that leans into the coconut’s island flavor.
- Make it vegan: Replace the honey with an equal amount of agave nectar or maple syrup so the entire dessert is plant-based and friendly for vegan guests.
- Build extra layers: Repeat the angled-pour technique with a third or fourth layer, alternating coconut and fruit jelly to create a striped effect in the jar.
- Use juice for bolder color: Make the fruit jelly with pomegranate juice instead of coconut water for a vivid, jewel-toned layer.
How to Store Layered Fruit Jelly Cups
Cover the jars in their serving cups and refrigerate them. They’ll stay fresh and hold their layered shape for about three to four days. After that, the fresh fruit starts to soften. For the best texture and prettiest presentation, enjoy them within the first day or two.
Layered Fruit Jelly Cups Tips

Can you use gelatin for layered fruit cups?
Yes, you can use gelatin instead of agar-agar in these layered fruit jelly cups, but it changes the dessert. Agar firms into a sturdy gel at room temperature, which is what makes the angled-jar layering easy to pull off; gelatin needs refrigeration to set and softens as it warms, so a gelatin version must stay chilled throughout the process, and the final result will be wobblier.
Conversion ratios for agar-agar and gelatin are not standardized. They can vary by source and brand, so treat any figure as a starting point. Generally, agar gels much more firmly—about a teaspoon of agar powder matches a tablespoon of gelatin—so you’d swap in roughly 3 tablespoons of gelatin for the 1 tablespoon of agar in the coconut layer and about 2 tablespoons for the 2 teaspoons of agar in the fruit layer. Since agar’s strength varies by brand, make a small batch to test it, start a little low and adjust from there.
What else can you use for serving layered fruit jelly cups?
Beyond mason jars, layered fruit jelly cups can be set and served in just about any small, clear vessel. Stemless wine glasses, juice glasses, lowball tumblers, ramekins, and dessert or parfait glasses all work. Two things matter more than the exact vessel: It should be see-through so the diagonal layers are visible; and it should be stable enough to rest at an angle without tipping while the coconut layer sets.
If you’d rather skip the tilted look, you can pour the layers flat into small bowls, teacups or even shot glasses for bite-sized portions. Or set everything in a loaf pan or square dish and cut the firm jelly into neat cubes once it’s chilled.
Ingredients
- coconut jelly:
- 2 cups coconut water
- 1 tablespoon agar agar powder
- 1 cup coconut milk
- 2 tablespoons honey
- 2 mason jars or serving cups
- fruit jelly:
- 2 cups coconut water
- 2 teaspoons agar agar powder
- 1/4 cup sliced fresh strawberries
- 1/4 cup fresh blueberries
- 1/4 cup green grapes, quartered
- 1/4 cup pomelo (or other citrus) pieces
Directions
-
1In a small saucepan, combine coconut water and agar agar; stir until smooth. Let stand 5 minutes.
-
2Cook over medium heat until mixture comes to a boil, whisking continuously. Reduce heat to low; add coconut milk and honey. Simmer for 2 minutes, stirring occasionally.
-
3Place Mason jars or serving cups at an angle inside a container. Carefully pour coconut jelly into jars. Let stand at room temperature until set, or refrigerate 30 minutes.
-
4For the fruit jelly, in a small saucepan, combine coconut water and agar agar. Let stand 5 minutes. Cook over medium heat until mixture comes to a boil, whisking continuously. Let stand 5 minutes.
-
5Place strawberries, blueberries, grapes and pomelo pieces in a bowl; pour jelly over top. Stir to coat.
-
6Remove jars from container so they stand upright. Pour fruit jelly over top. Cover loosely, let stand at room temperature or refrigerate until fully set.