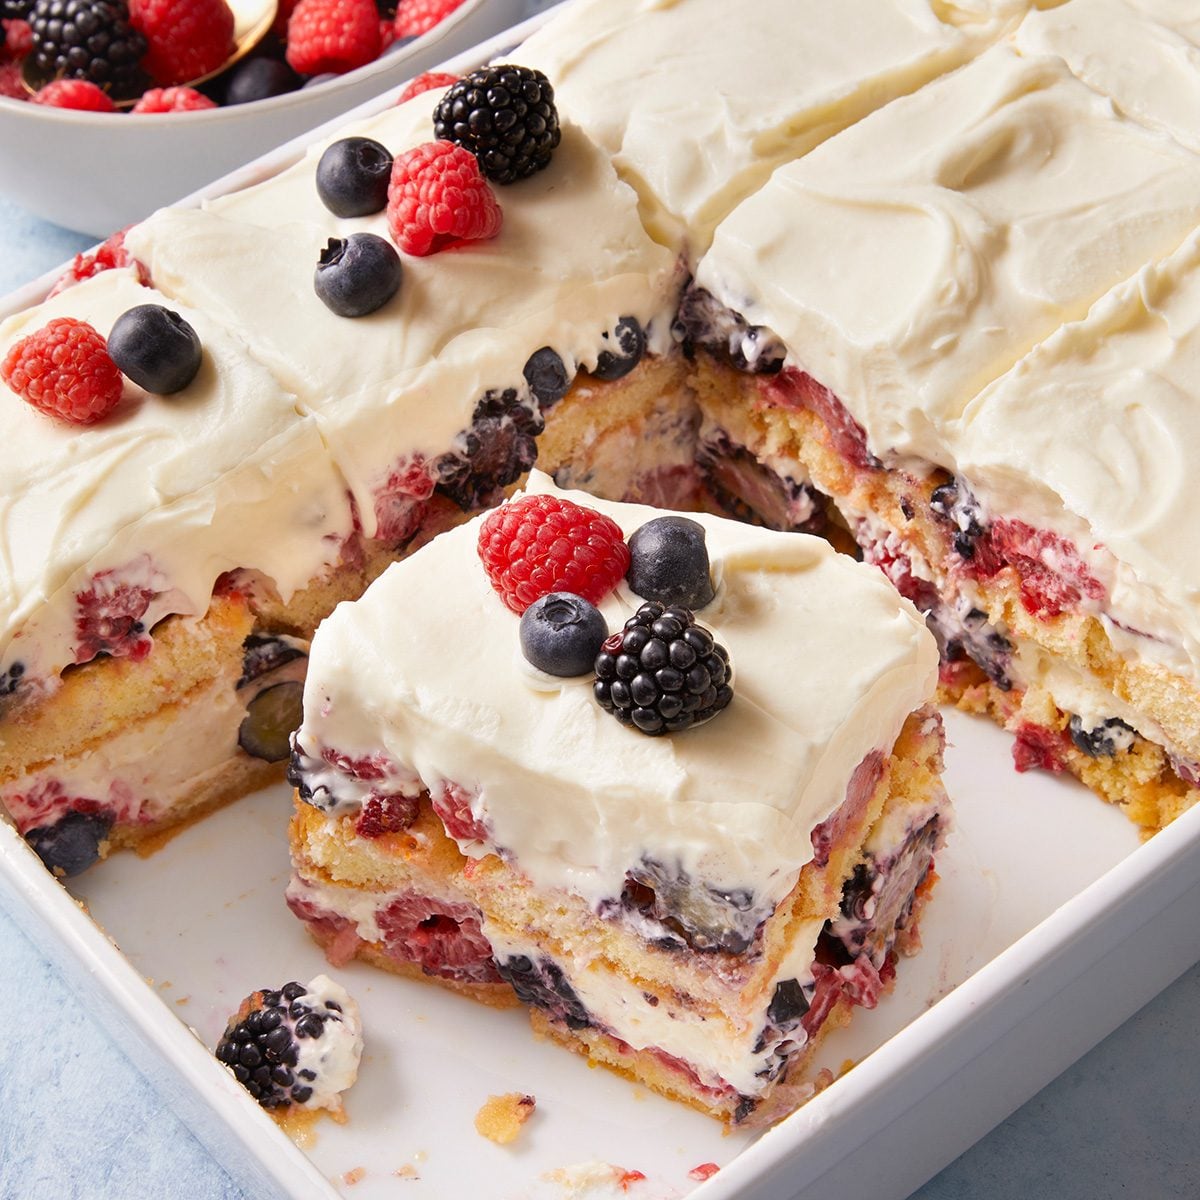
Bright berries and cream are a match made in heaven in this berry tiramisu, with tender ladyfinger cookies soaking up all the fruit juice.
Stripes of creamy white and juicy red and blue make mixed berry tiramisu a show-stopping dessert. The dish takes cues from the classic Italian tiramisu, in which airy ladyfinger cookies are soaked in espresso, layered with rich mascarpone and whipped cream, and dusted with dark cocoa powder. (No wonder the word tiramisu translates to “pick-me-up!”) The original is creamy and decadent, but quite intense.
Luckily, the basic template of layered pastry and cream is also versatile: We have dozens of offbeat tiramisu variations. This fruit-forward berry tiramisu recipe shows off ripe summer fruits, using both the fruit juice and the berries themselves for flavor. It’s a refreshing fruit dessert for a hot summer day, and it looks pretty on any buffet table. Recipe contributor Najmussahar Ahmed of Ypsilanti, Michigan, suggests serving it in a clear glass bowl or dish to show off the colorful layers.
Ingredients for Berry Tiramisu
- Fresh berries: The star ingredients of this fruit dessert are fresh raspberries, blackberries, blueberries and sliced strawberries. Look for unblemished, uncrushed berries. Save a few berries to garnish the top of the dessert.
- Sugar: White granulated sugar gets tossed with the berries, creating a glaze-like texture and drawing out the fruit juices. Sugar is also used in the creamy filling.
- Orange zest: To zest an orange, first wash it well with soapy water to remove the waxy coating. Use a rasp grater (aka a Microplane) to remove the outermost layer of orange peel. Avoid the bitter white pith.
- Orange juice: Juice the orange you’re zesting rather than using store-bought juice. You may need a second orange to get enough.
- Heavy whipping cream: Softly whipped cream is delightfully indulgent, and it plays an important role in the tiramisu’s texture.
- Mascarpone cheese: Sweet, rich mascarpone cheese is the foundation of the classic dessert. It’s very dense, so you’ll fold in the whipped cream to lighten it.
- Vanilla extract: Use a high-quality vanilla extract brand for the most aromatic flavor.
- Crisp ladyfinger cookies: Look for ladyfinger cookies in the produce section of most supermarkets. The light, airy cookies soak up the fruit juice like a sponge. Using homemade ladyfinger cookies is an excellent way to elevate this dessert.
Directions
Step 1: Sweeten the berries

Place the clean, dry berries in a large bowl. Mix 1/3 cup sugar with the orange zest and orange juice. Gently toss the mixture with the berries. Refrigerate the berries, covered, for 45 minutes.
Editor’s Tip: You can alternatively add the sugar, zest and juice to the bowl with the berries without mixing them first. Just be sure to give the berries an extra stir to evenly incorporate everything.
Step 2: Whip the cream

Beat the cream until soft peaks form. In another bowl, mix the mascarpone cheese, the vanilla, and the remaining 1 cup of sugar.
Editor’s Tip: Beating the cream to soft peaks shouldn’t take long. Test by lifting the beaters. If the whip has enough form to stick to the beater, that’s a good sign. When you lift the beater upright, the tip of the cream should droop down. (With stiff peaks, it would stand upright.)
Step 3: Combine the creamy layer
With a large spoon or spatula, gently fold the whipped cream into the mascarpone mixture, adding a third of the cream at a time.
Editor’s Tip: Folding ingredients is different from stirring. Use a vertical scooping motion to blend the delicate whipped cream into the thicker cheese. The softer motions are meant to protect the whipped cream’s airy texture.
Step 4: Drain the berries
Set a colander or strainer over a shallow bowl. Strain the berries, reserving the juices.
Step 5: Build the tiramisu
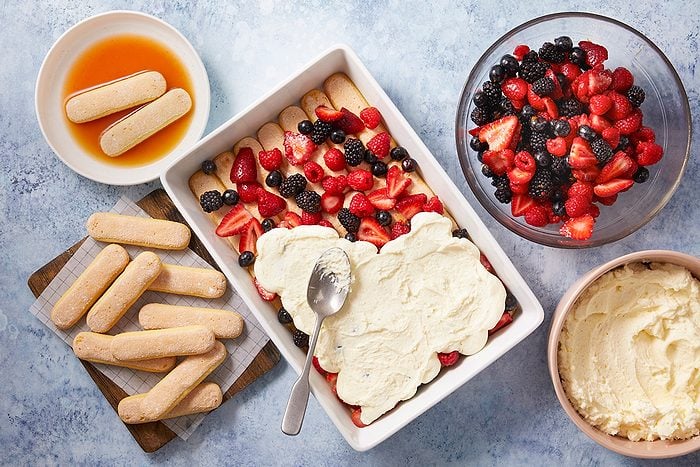
Dip one package of the ladyfingers in the reserved juices, allowing the excess to drip off. Arrange the ladyfingers in a single layer on the bottom of a 13×9-inch dish. Spread half the berries over the ladyfingers, and then spread half the mascarpone mixture over the top. Repeat the layers, starting with the second package of ladyfingers, then adding the remaining berries and mascarpone.
Step 6: Chill the tiramisu
Refrigerate the mixed berry tiramisu, covered, overnight. If desired, top it with additional berries before serving it.
Editor’s Tip: Letting the tiramisu sit overnight helps to set the layers and gives the ladyfingers plenty of time to absorb all the juice and become deliciously soft.

Mixed Berry Tiramisu Variations
- Mix up the citrus: Try Meyer lemon or tangerine juice instead of orange juice.
- Add booze: Some tiramisu recipes call for Kahlua, a coffee liqueur. Alcohol adds a sharp note that balances sweetness. In this fruity version, try mixing a shot of brandy, Marsala wine, dark rum or Amaretto in with the berries and juice.
- Get fruity: Use different fruits, depending on your tastes and the seasons. In the winter, try sliced ripe mangos, kiwi or pineapple. In the summer, try stone fruits like peaches or nectarines.
- Add chocolate: For some, it’s not a dessert unless it has chocolate. Add shavings or curls of chocolate to the top of the tiramisu for extra flair.
How to Store Mixed Berry Tiramisu
Store berry tiramisu in the refrigerator, tightly covered with storage wrap.
How long will mixed berry tiramisu last?
In the refrigerator, tiramisu will keep for up to four days. It will taste freshest for the first two days; after that, the ladyfingers may get quite soft.
Berry Tiramisu Tips

Can you make mixed berry tiramisu in a different type of pan?
You can make berry tiramisu in almost any vessel you like. We prefer using clear glass to showcase the layers of tiramisu—think vintage serving bowls or punch bowls. In a pinch, you could use a metal pan or Bundt pan.
How do you get a clean slice of mixed berry tiramisu?
The trick for a clean slice of tiramisu is the same as the trick for slicing cake. Use a serrated knife, and run it under hot water before slicing the tiramisu. Dry it well and cut a portion, then repeat, rinsing and drying between every slice. Use a pie server or offset spatula to lift it from the pan.
Ingredients
- 3 cups fresh raspberries
- 3 cups fresh blackberries
- 2 cups fresh blueberries
- 2 cups fresh strawberries, sliced
- 1-1/3 cups sugar, divided
- 4 teaspoons grated orange zest
- 1 cup orange juice
- 1 cup heavy whipping cream
- 2 cartons (8 ounces each) mascarpone cheese
- 1 teaspoon vanilla extract
- 2 packages (7 ounces each) crisp ladyfinger cookies
- Additional fresh berries, optional
Directions
-
1Place berries in a large bowl. Mix 1/3 cup sugar, orange zest and orange juice; toss gently with berries. Refrigerate, covered, 45 minutes.
-
2Beat cream until soft peaks form. In another bowl, mix mascarpone cheese, vanilla and remaining 1 cup sugar. Fold in whipped cream, a third at a time.
-
3Drain berries over a shallow bowl, reserving juices. Dip ladyfingers in reserved juices, allowing excess to drip off; arrange ladyfingers in a single layer on bottom of a 13x9-in. dish. Layer with half the berries and half the mascarpone mixture; repeat layers, starting with ladyfingers.
-
4Refrigerate, covered, overnight. If desired, top with additional berries before serving.